
The Pallet Hive
if I can build one, so can you!
If there is one reservation I have about the Drayton Hive is that its construction requires real woodworking skills which make it costly. I therefore set out on building a hive which suits a similar approach to beekeeping, but which is made from old pallets, a common and inexpensive resource. For me this presented a particular challenge because I am not a woodworker – I even had to buy the tools before I could start.
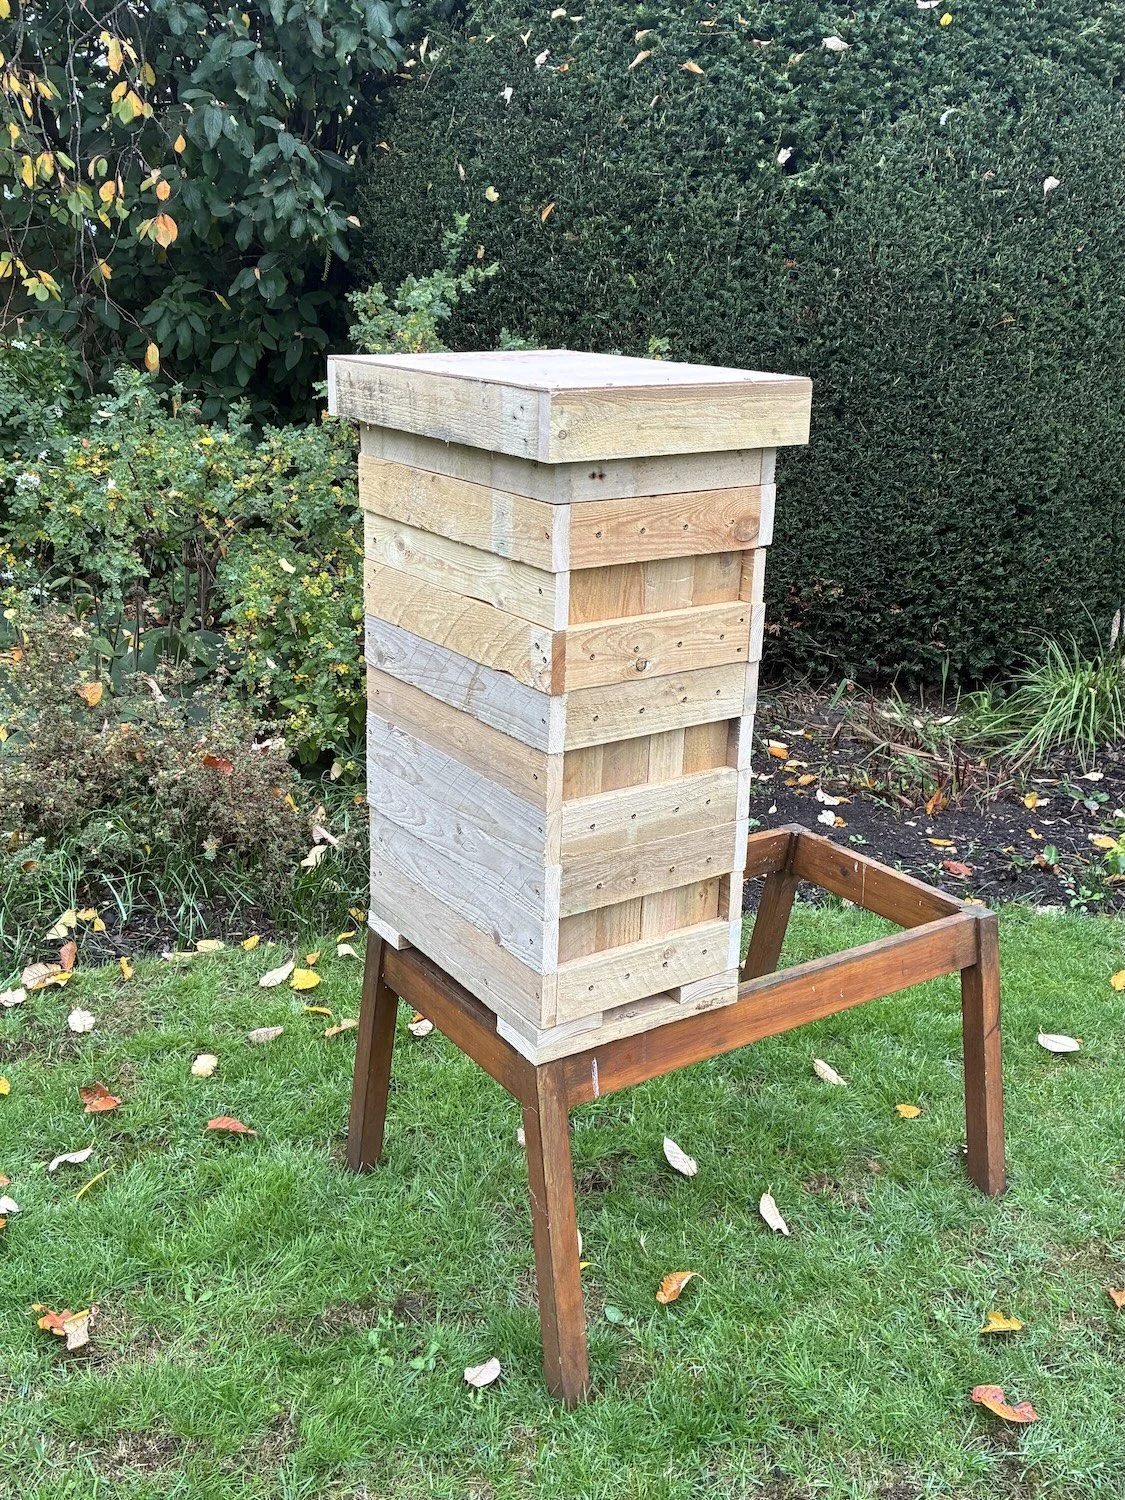
The design is based on narrow British Standard brood boxes; there are four of them, each fitted with just eight foundationless frames. The bottom two boxes are for the queen and her cluster and, together, they provide more space for summer expansion and winter storage than the usual 11-frame box. There is then a queen excluder under box 3, which is the ‘honey’ box, a crown board with a feeding hole (covered when not in use), and box 4 which is held in reserve in case a strong honey flow requires more space. Without its frames it can also hold a half-gallon feeder and, in winter, insulation to help maintain hive warmth. There is also a floor incorporating a small entrance and, of course, a roof.
Although it is of vertical format, no lifting is involved in the hive’s management. I am a minimal interventionist so believe it is unnecessary to disturb the two brood boxes while they are occupied. Honey is extracted by removing a few frames at a time from the honey box and returning them to the hive in a single operation, in the same way as with the Drayton Hive - see here.
The prototype pallet hive attracted considerable interest and, for those who may be tempted to build their own, I offer the following sketches and the cutting list of the timber. First, though, some cautionary words of advice.
I didn’t have the tools to dismember pallets myself so took my cutting list to a local wood recycling centre which supplied de-nailed, one-inch pallet wood in widths of 3, 4 and 5 inches. These measurements fitted the design perfectly – apart from one; I had to order a strip cut to a width of 2 ½ inches. But, as I quickly discovered, pallet construction is a rough-and-ready process, and these measurements were both approximate and inconsistent. However, it is vital that bee space is maintained accurately and that the boxes fit together without gaps between them. The only way to achieve this is to accept that occasional gaps may have to be allowed between the boards making up the hive walls, and these I covered on the inside with thin timber strip. I was confident that any remaining gaps would be quickly filled with propolis by the bees themselves.
The assembly itself was simple. All joints were secured by a combination of bee-friendly wood glue and 400mm screws, using a cheap battery-powered drill and screwdriver I bought for the purpose. I cut a standard plastic excluder to size and framed it in stripwood. The crown board consists of 4mm ply with a feeding hole in the middle and is also framed in stripwood in such a way that the ply itself is not exposed to the elements to prevent it delaminating. The roof has another sheet of ply over side walls and is covered in rubber roofing membrane. I then applied three coats of a bee-friendly preservative to all exterior wooden surfaces.
The result may not be elegant but it is sturdy – and heavy. A permanent site should therefore be found and the hive raised from the ground. Mine is positioned on an old 18-inch hive stand.

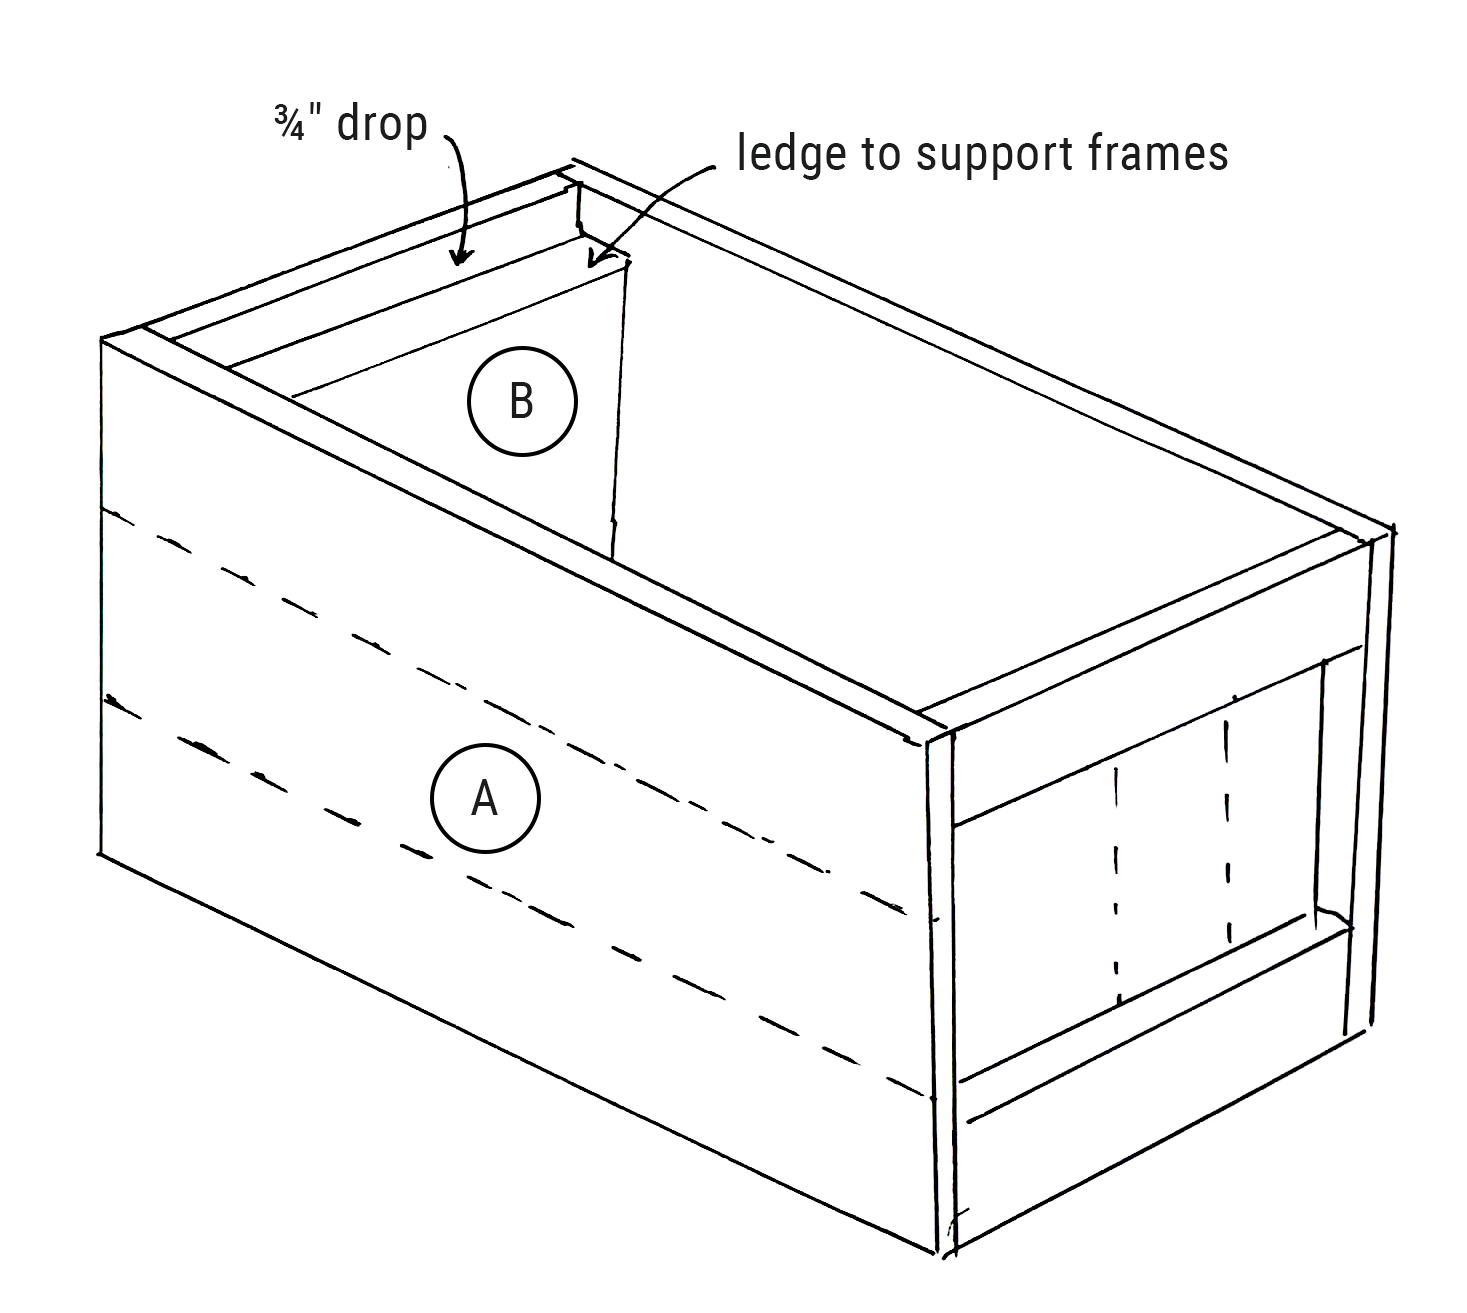
FOUR BOXES – note: the sketches are not to scale
Each box consists of two side panels (A) and two end panels (B)
Each side panel consists of three boards of 3-inch timber, cut to 19 ⅛ inches
Each end panel consists of two boards of 3-inch timber and one of 2 ½-inch timber, all cut to 8 ¼ inches mounted vertically against two horizontal boards of 3-inch timber cut to 11 ½ inches. Each of these horizontal boards has to align with the top and bottom respectively of the side panels, creating a ¾-inch drop to a ledge from which the frames are suspended
Cutting list for EACH BOX
3-inch timber
6 x 19 ⅛ inches
6 x 8 ¼ inches
4 x 11 ½ inches
2 ½-inch timber
2 x 8 ¼ inches
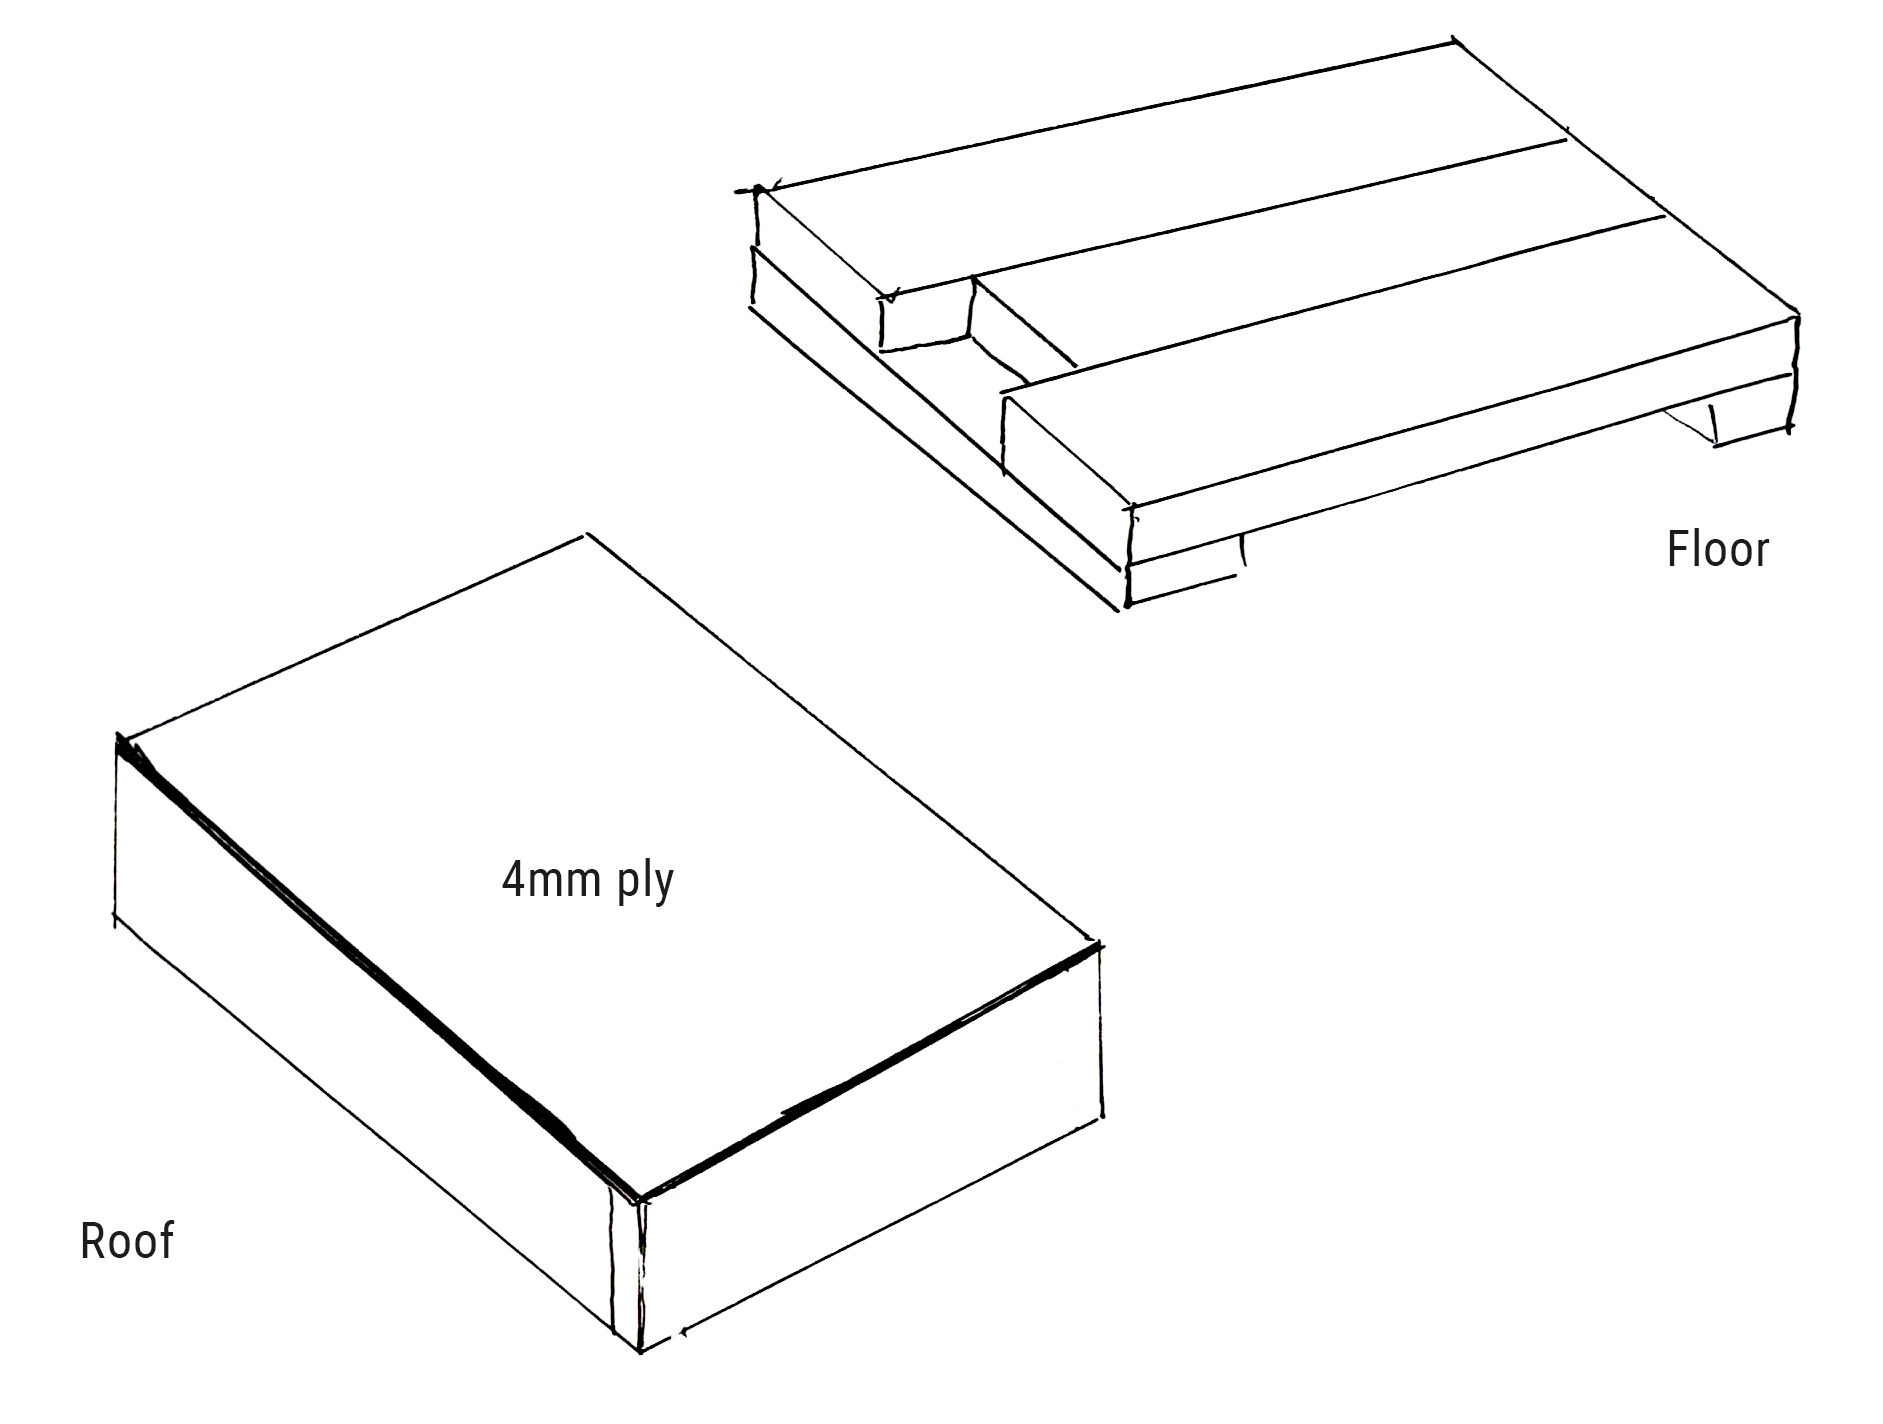
THE FLOOR
This consists of two 4-inch boards cut to 19 ⅛ inches on either side of a 5-inch board cut to 16 inches as shown in the sketch. They are held in place by two 4-inch ‘feet’ cut to 13 inches. The boxes overhang the floor by ¼ inch on either side.
Cutting list
5-inch timber
1 x 16 inches
4-inch timber
2 x 19 ⅛ inches
2 x 13 inches
THE ROOF
This consists of an open ‘box’ with walls that are made from 3-inch timber and a covering of 4mm ply. It is then covered with rubber roofing membrane or other suitable material
Cutting list
3-inch timber
2 x 19 ½ inches
2 x 15 ¾ inches
4mm ply
21 ½ x 15 ¾ inches